
DIY: At Home Spa Experience
If you’ve been to a spa, you know what a relaxing experience it can be. You also know what an expense it is! Before the pandemic, I would go to the spa three or four times per year. Nothing crazy, I know plenty of people who go at least monthly, but to me it felt like an indulgence.
The place I loved unfortunately closed due to the pandemic and I just haven’t had a chance to find someplace new. So, last year for Christmas I asked for a face steamer to do my own at-home facials and I feel like I’ve gotten pretty good at recreating the relaxing experience I get from the spa.
Depending on how much time you have, you can make this as short or as drawn out as you want. Sometimes I will give myself a quick facial on a Thursday evening or I’ll spend half of a Saturday afternoon pampering myself. This outlines the full pampering…
What you’ll need:
Relaxing Music
Face wash
Face mask
Sheet mask
Toner
Serums
Face Moisturizer
2-3 Washcloths
Drinking water
Optional:
Oil diffuser w/essential oils
Face steamer
Robe
Optional if incorporating bath:
Bathtub
Bath bomb, bubble bath, or bath oils/salts, etc
Foot scrub
Pumice stone
Foot lotion/body moisturizer
Socks
Bath towel
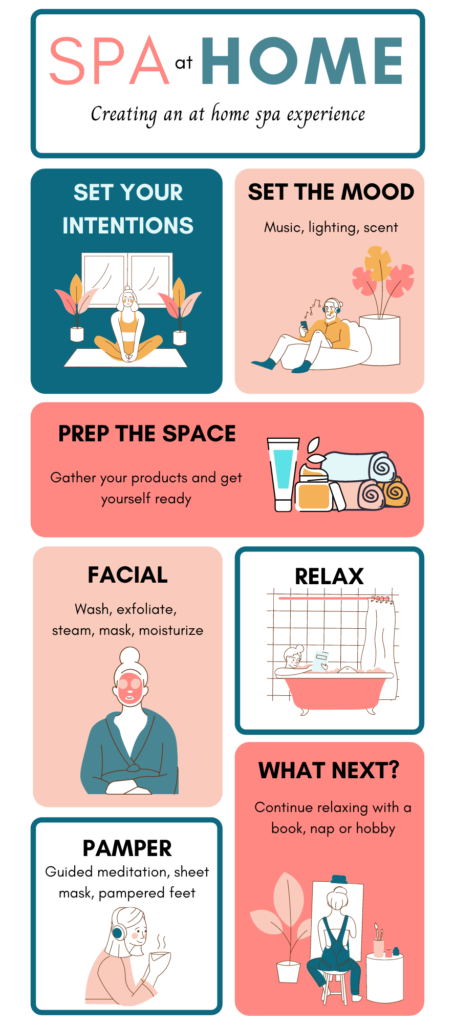
Set your intentions
Unlike a quick facial where your intention might just be to GLOW, the spa experience should be more about overall self care. How do you want to feel when you’re done? Relaxed? Energized? Setting this intention before you start will help you choose your music, essential oils, and even your face mask.
Set the Mood
I find it helpful to pamper myself during the day because the lighting in my bathroom is all or nothing and once I’m relaxing in the tub, I want the lights off, but the window gives me enough light to still see. Bring in a lamp with soft lighting if you don’t have a window. Or even better, use a sound machine that has a light in it! My sound machine has a bunch of different lighting and sound effects that are perfect for relaxation.
Speaking of sound, it’s time to choose your music. I think it’s best to choose something instrumental as lyrics can be distracting. You might also want a guided meditation cued up for the face masks.
Set up an oil diffuser for extra mood boosting points. Lavender is typically the go-to for relaxation. I will also use eucalyptus to really open up my sinuses or something citrusy to feel energized.
Gather your products
You’ll want everything within reach so you don’t break the mood because you can’t find your toner. Organize your products next to where you need them. Put the bath bomb, a washcloth, foot scrub, pumice, and sheet mask next to the tub (don’t forget your towel!).
Set up your steamer, face wash, mask, etc near the sink. You should also consider bringing in a chair or stool unless you don’t mind standing over the sink or steamer for 10 minutes… but standing isn’t exactly relaxing.
Don’t forget your water! Keep drinking it throughout your spa day. Spending time in water actually dehydrates you, so replenish yourself from the inside, too!
Get yourself ready
Time to get naked! Sometimes I start my spa experience with a quick shower, especially if I’m planning on washing my hair that day or need to shave my legs. Don’t waste bath time on shaving. The bath is all about being still!
If you do decide to shower first, this is the perfect time to wash your face, thus starting the facial process.
Either way, put on a robe or wrap yourself in a fluffy bath towel to keep you warm before you get in the tub. Depending on how long it takes to fill your bathtub, start the bath now or when you start the steamer. You’ll want the tub ready as soon as you get your face mask on.
The Spa At Home Experience
Step 1: Wash your face.
Take your time massaging the product into your skin and gently rinse off or remove with a wet washcloth.
Step 2: Exfoliate.
You can use an exfoliating product for this step, but be aware that the little scrubbies in an exfoliator are actually putting tiny scratches on your face and could cause more damage. For me, exfoliators cause breakouts. So, I use a clean, warm and wet washcloth (not the same one from removing the face wash) to gently scrub my face.
Step 3: Steam.
Fill the sink with HOT water or use a face steamer. If using the sink, put a towel over your head and sink to trap the steam. The time is up to you, but 10 minutes should be enough to open your pores.
Step 4: Face mask.
This goes back to your intentions, but also any issues you want to address. Got breakouts? Try a clay mask. Parched skin? Use a mask with hyaluronic acid. Apply your mask slowly, massaging it into your skin and cover evenly.
Try this homemade face mask to reduce inflammation, redness and breakouts: Cinnamon Honey Face Mask
Step 5: Tub time! (+sheet mask and pampered feet)
Throw a bath bomb into the tub and sink yourself into the soothing water. Sit back and listen to the calming music while the face mask works its magic. The steam from the bath will also help the mask penetrate your skin.
After 10-15 minutes, remove your mask with the washcloth you set next to the tub earlier.
If you want to pamper your feet, too, now is the time to use your foot scrub or pumice stone.
Next, open up your sheet mask and start the guided meditation. Adjust the sheet mask over your face, lay back and focus on your breathing.
Once the meditation is over, remove the sheet mask and massage the leftover serum into your skin.
I often hop in the shower for a quick rinse off from the tub. If you choose to do this, make sure NOT to rinse off your face or you’ll lose all that goodness from the sheet mask.
PS You can skip this step if you don’t have a tub or dislike baths or whatever. Just go lay down in your bed for 15 minutes and let the mask do it’s thing. Remove with a wet, warm washcloth and repeat with the sheet mask and guided meditation.
Step 6: Moisturize your Bod.
First, don’t forget to moisturize your body after the bath! Slather on a good amount of lotion on your feet and put on socks for 10-15 minutes for super soft feet.
Then, wash your hands and get back to your face.
Step 7: Toner.
Why use a toner after all of this? Toners restore your skin. They remove any leftover traces of dirt in your pores and help even out your texture and of course your tone. Using a toner is a great base before serums and moisturizer.
Step 8: Serums.
This step is ALL about what your skin needs the most. Do you have dark spots, fine lines, or acne? There’s a serum for that. And the beauty of serums is that you can layer them on! Be sure to wait a good 10 minutes between applications for the serums to fully sink into your skin, though.
Step 9: Moisturize.
The final step of any facial is to moisturize. Moisturizer locks in those serums and gives your skin the hydration it needs to keep glowing. Take your time to really massage your moisturizer into your skin. If you’re planning to go out into the world after this, be sure to use a moisturizer with SPF!
Step 10: Are your socks still on?
Your facial might be over, but that doesn’t mean you can’t give yourself a good foot massage! Remove your socks and work the rest of the moisturizer into your heels, arches, and pads.
What’s next?
You can either get dressed and get on with your day or enjoy your feeling of relaxation and go take a nap! Just don’t forget to drink your water!
Want to see more posts like this?
Sign up for our newsletter below
The form you have selected does not exist.